• Aurora Home Inspector
  • Home - Craftsman Home Inspections
  • About
  • Contact
  • Schedule Home Inspection
  • What is a Home Inspection?
  • What Is Radon?
  • Our Standards of Practice
  • Our Code of Ethics
  • Sign Your Agreement
  • SAMPLE Home Inspection REPORT
  • Blog - From The Home Inspectors Blog
  • Friendly Referral's
  • Real Estate Agents
Craftsman Home Inspections llc


From The Inspectors Blog

Basic Waterproofing for Basements

3/30/2016

1 Comment

 
by Nick Gromico and Ethan Ward
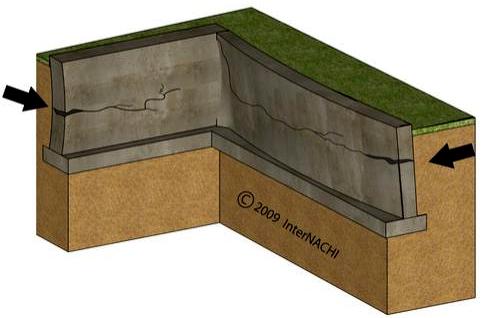
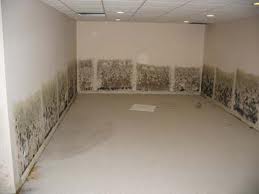
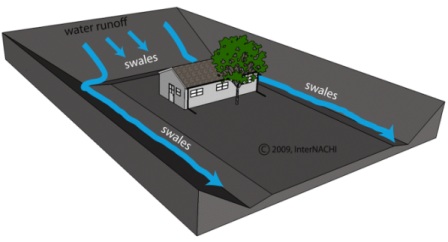
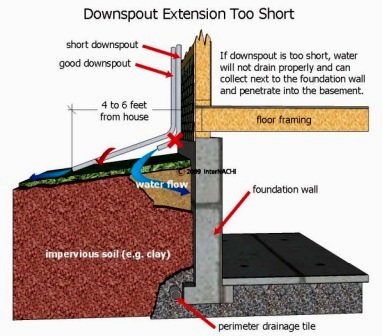
Picture

Water Damage Concerns
​
 Basements are typically the area of a structure most at risk for water damage because they are located below grade and surrounded by soil.  Soil releases water it has absorbed during rain or when snow melts, and the water can end up in the basement through leaks or cracks.  Water can even migrate through solid concrete walls via capillary action, which is a phenomenon whereby liquid spontaneously rises in a narrow space, such as a thin tube, or via porous materials.  Wet basements can cause problems that include peeling paint, toxic mold contamination, building rot, foundation collapse, and termite damage.  Even interior air quality can be affected if naturally occurring gasses released by the soil are being transmitted into the basement.  
Properly waterproofing a basement will lessen the risk of damage caused by moisture or water.  Homeowners will want to be aware of what they can do to keep their basements dry and safe from damage.  Inspectors can also benefit from being aware of these basic strategies for preventing leaks and floods. 
Prevent water entry by diverting it away from the foundation.
Preventing water from entering the basement by ensuring it is diverted away from the foundation is of primary concern.  Poor roof drainage and surface runoff due to gutter defects and improper site grading may be the most common causes of wet basements.  Addressing these issues will go a long way toward ensuring that water does not penetrate the basement.
Here are some measures to divert water away from the foundation:

  • Install and maintain gutters and downspouts so that they route all rainwater and snow melt far enough away from the foundation of the building to ensure that pooling does not occur near the walls of the structure.  At least 10 feet from the building is best, and at the point where water leaves the downspout, it should be able to flow freely away from the foundation instead of back toward it, and should not be collecting in pools.

  • The finish grade should be sloped away from the building for 10 to 15 feet.  Low spots that may lead to water pooling should be evened out to prevent the possibility of standing water near the foundation.

  • Shallow ditches called swales should be used in conditions where one or more sides of the building face an upward slope.  A swale should slope away from the building for 10 to 15 feet, at which point it can empty into another swale that directs water around to the downhill-side of the building, leading it away from the foundation.
  
Repair all cracks and holes.
 
If leaks or seepage is occurring in the basement's interior, water and moisture are most likely entering through small cracks or holes.  The cracks or holes could be the result of several things.  Poor workmanship during the original build may be making itself apparent in the form of cracks or holes.  Water pressure from the outside may be building up, forcing water through walls.  The house may have settled, causing cracks in the floor or walls.  Repairing all cracks and small holes will help prevent leaks and floods. 
 
Here are some steps to take if you suspect that water is entering the basement through cracks or holes:

  • Identify areas where water may be entering through cracks or holes by checking for moisture, leaking or discoloration.  Every square inch of the basement should be examined, especially in cases where leaking or flooding has not been obvious, but moisture buildup is readily apparent.

  • A mixture of epoxy and latex cement can be used to fill small hairline cracks and holes.  This is a waterproof formula that can help ensure that moisture and water do not penetrate basement walls.  It is effective primarily for very small cracks and holes.

  • Any cracks larger than about 1/8-inch should be filled with mortar made from one part cement and two parts fine sand, with just enough water to make a fairly stiff mortar.  It should be pressed firmly into all parts of the larger cracks and holes to be sure that no air bubbles or pockets remain.  As long as water is not being forced through basement walls due to outside pressure, the application of mortar with a standard trowel will be sufficient if special care is taken to fill all cracks completely.

  • If water is being forced through by outside pressure, a slightly different method of patching with mortar can be used.  Surface areas of walls or floors with cracks should first be chiseled out a bit at the mouth of the crack and all along its length.  Using a chipping chisel and hammer or a cold chisel, cut a dovetail groove along the mouth of each crack to be filled, and then apply the mortar thoroughly.  The dovetail groove, once filled, should be strong enough to resist the force of pressure that was pushing water through the crack.
Apply sodium-silicate sealant to the walls and floor.
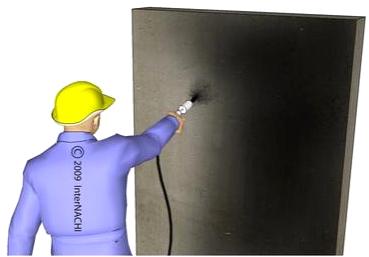
Once all runoff has been thoroughly diverted away from the foundation, and all cracks and holes have been repaired and no leaking is occurring, a waterproof sealant can be applied as a final measure.  
Sodium silicate is a water-based mixture that will actually penetrate the substrate by up to 4 inches.  Concrete, concrete block and masonry have lime as a natural component of their composition, which reacts with the sodium silicate to produce a solid, crystalline structure which fills in all the microscopic cracks, holes and pores of the substrate.  No water vapor or gas will be able penetrate via capillary action because the concrete and masonry have now become harder and denser from the sodium silicate. 
 
Here are some steps and tips for its application:
  • Special care should be taken when applying sodium silicate.  It is an alkaline substance and, as such, can burn skin and eyes if it comes into contact with them.  Inhalation can also cause irritation to the respiratory tract.

  • Sodium silicate must be applied only to bare concrete, concrete block or masonry that has been cleaned thoroughly and is free of any dirt, oil, adhesives, paint and grease.  This will ensure that it penetrates the substrate properly and fills in all microscopic cracks.  It can be applied using a garden sprayer, roller or brush to a surface that has first been lightly dampened with a mop or brush.  Apply two to three coats to the concrete, waiting 10 to 20 minutes between each application.  Concrete block and masonry will take three to four coats, with the same 10 to 20 minutes between applications.  Any excess should then be wiped away.  Sodium silicate should not be over-applied or it will not be completely absorbed by the substrate, leaving a white residue.

  • Paint can then be applied without fear of water vapor getting trapped between the paint and the wall, which could eventually cause blistering and peeling.  Adhesives for tile or floor covering can also be used more effectively, once the substrate has been sealed.
Diverting water away from foundations so that it does not collect outside basement walls and floors is a key element in preventing flooding and water damage.  Ensuring that any water that does end up near basement exteriors cannot enter through holes or cracks is also important, and sealing with a waterproof compound will help prevent water vapor or gas from penetrating, as well.  By following these procedures, the risk of water-related issues in basement interiors can be greatly reduced, protecting the building from damage such as foundation rotting, mold growth, and peeling paint, as well as improving the interior air quality by blocking the transmission of gasses from the soil outside. 

Picture

Craftsman Home Inspections llc is a home inspection and Radon Testing company proudly serving the Aurora CO and Denver CO Metro Areas. If you are looking for a Home Inspector in Aurora or Denver, please give us a call at 720-593-0383 or check us out online at CraftsmanColorado.com or simply schedule your home inspection below.

SCHEDULE INSPECTION
1 Comment
1-800 Water Damage link
2/25/2022 03:41:24 am

Water damage is a broad term that encompasses a variety of water-related incidents, from a broken pipe to a severe storm. The most common type of water damage is caused by rain or water seeping in through a crack in the roof or foundation. Regardless of the cause, water damage can result in extensive property damage and serious health risks if not addressed quickly.

Reply


Leave a Reply.

    Author

    Craftsman Home Inspections. We are your Aurora and Denver Colorado Home Inspectors. Here you will find useful information about the Home Inspection industry as well as home maintenance tips.

    Archives

    April 2020
    January 2020
    June 2019
    May 2019
    January 2018
    November 2017
    October 2017
    October 2016
    September 2016
    July 2016
    June 2016
    March 2016
    February 2016
    December 2015
    November 2015
    October 2015
    September 2015

    Categories

    All

    RSS Feed

Our
Best
Inspection
Every
Time!®


We are your Aurora and Denver Colorado Home Inspector / Radon Testing Pro's.

Craftsman Home Inspections llc

At Craftsman Home Inspections we are professionals who promise to give you our best Home inspection every time.

Call or Text Us Now!

720-593-0383


Insured

Proudly Performing Home Inspections in Aurora CO, Denver CO and the surrounding Metro Areas.
© COPYRIGHT 2015. ALL RIGHTS RESERVED.