|
|
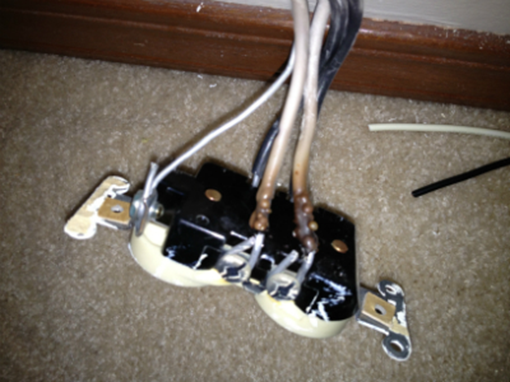
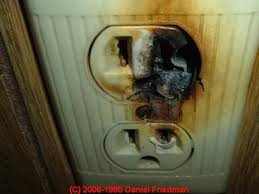
by Nick Gromicko and Kenton Shepard 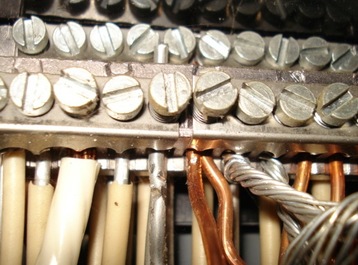 Between approximately 1965 and 1973, single-strand aluminum wiring was sometimes substituted for copper branch-circuit wiring in residential electrical systems due to the sudden escalating price of copper. After a decade of use by homeowners and electricians, inherent weaknesses were discovered in the metal that lead to its disuse as a branch wiring material. Although properly maintained aluminum wiring is acceptable, aluminum will generally become defective faster than copper due to certain qualities inherent in the metal. Neglected connections in outlets, switches and light fixtures containing aluminum wiring become increasingly dangerous over time. Poor connections cause wiring to overheat, creating a potential fire hazard. In addition, the presence of single-strand aluminum wiring may void a home’s insurance policies. Inspectors may instruct their clients to talk with their insurance agents about whether the presence of aluminum wiring in their home is a problem that requires changes to their policy language. Facts and Figures
Aluminum as a Metal Aluminum possesses certain qualities that, compared with copper, make it an undesirable material as an electrical conductor. These qualities all lead to loose connections, where fire hazards become likely. These qualities are as follows:
Aluminum wiring should be evaluated by a qualified electrician who is experienced in evaluating and correcting aluminum wiring problems. Not all licensed electricians are properly trained to deal with defective aluminum wiring. The CPSC recommends the following two methods for correction for aluminum wiring:
Craftsman Home Inspections llc is a home inspection company proudly serving the Aurora CO and Denver CO Metro Areas. If you are looking for a Home Inspector in Aurora or Denver, please give us a call at 720-593-0383 or check us out online at CraftsmanColorado.com or simply schedule your home inspection below.
SCHEDULE INSPECTION
2 Comments
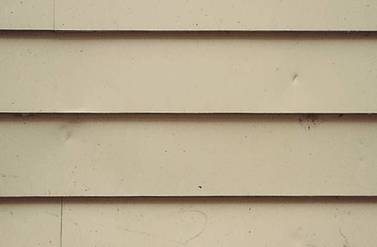
by Nick Gromicko and Ethan Ward 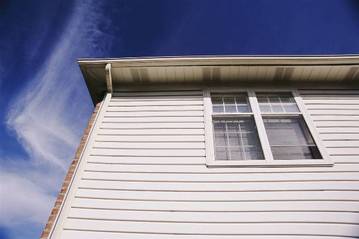 Aluminum siding is generally in decline as an exterior cladding material because vinyl siding and other materials have become more popular choices. However, it is still among the most common forms of siding found today. It provided many advantages over other materials when it was introduced in the 1940s. It was installed on many affordable homes through the 1970s. InterNACHI inspectors will encounter aluminum siding on many home exteriors and can benefit from knowing more about this common form of exterior cladding. Homeowners may be interested in the drawbacks of this material, as well as some of the advantages it still provides in certain situations today. History and Manufacturing Aluminum siding is made from aluminum coil stock, which is chemically coated to protect the metal and then painted for further protection, as well as aesthetics. After coating, the siding is baked for durability, with enamel often added to create desired textures. One of the earliest architectural uses of aluminum came in the 1920s when it was used to produce ornamental spandrel panels for the Chrysler Building and the Empire State Building in New York City. By the 1940s, aluminum siding was being produced for use on residential structures, and quickly became popular due to the advantages it provided over other materials in use at the time. A Pennsylvania subdivision built in 1947 was reportedly the first housing project to use solely aluminum siding. Its popularity remained fairly steady until the 1970s, during the energy crisis. Aluminum siding requires a great deal of energy for production, as well as consumption of a significant amount of raw materials. These factors largely contributed to its decline in use as other forms of exterior cladding became more popular. Pros and Cons Although aluminum siding is seeing less use these days, it possesses some attributes that may be seen as advantageous over other materials in certain situations. There are also some areas where aluminum siding doesn’t stack up quite as well as other options. Here are some pros and cons to consider with aluminum siding. Advantages
Here are some things that inspectors can keep in mind while examining exterior walls clad in aluminum siding:
 Craftsman Home Inspections llc is a home inspection company proudly serving the Aurora CO and Denver CO Metro Areas. If you are looking for a Home Inspector in Aurora or Denver, please give us a call at 720-593-0383 or check us out online at CraftsmanColorado.com or simply schedule your home inspection below.
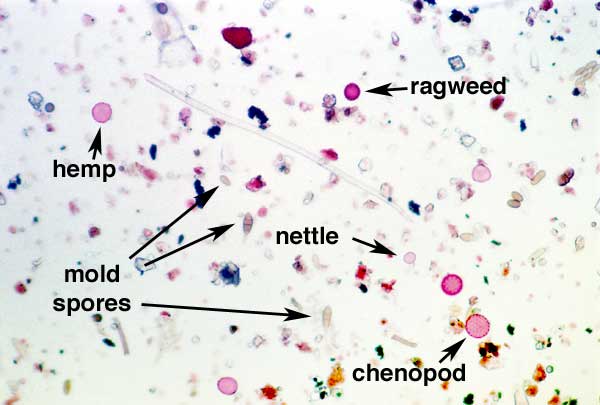
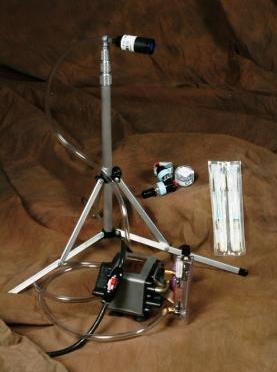
SCHEDULE INSPECTION by Nick Gromicko and Ethan Ward Taking air samples during a mold inspection is important for several reasons. Mold spores are not visible to the naked eye, and the types of mold present can often be determined through laboratory analysis of the air samples. Having samples analyzed can also help provide evidence of the scope and severity of a mold problem, as well as aid in assessing human exposure to mold spores. After remediation, new samples are typically taken to help ensure that all mold has been successfully removed. Air samples can be used to gather data about mold spores present in the interior of a house. These samples are taken by using a pump that forces air through a collection device which catches mold spores. The sample is then sent off to a laboratory to be analyzed. InterNACHI inspectors who perform mold inspections often utilize air sampling to collect data, which has become commonplace. Air-Sampling Devices There are several types of devices used to collect air samples that can be analyzed for mold. Some common examples include:
Samples are generally best taken if visual, non-invasive examination reveals apparent mold growth or conditions that could lead to growth, such as moisture intrusion or water damage. Musty odors can also be a sign of mold growth. If no sign of mold or potential for mold is apparent, one or two indoor air samples can still be taken, at the discretion of the inspector and client, in the most lived-in room of the house and at the HVAC unit. Outdoor air samples are also typically taken as a control for comparison to indoor samples. Two samples -- one from the windward side and one from the leeward side of the house -- will help provide a more complete picture of what is in the air that may be entering the house through windows and doors at times when they are open. It is best to take the outdoor samples as close together in time as possible to the indoor samples that they will be compared with. InterNACHI inspectors should avoid taking samples if a resident of the house is under a physician’s care for mold exposure, if there is litigation in progress related to mold on the premises, or if the inspector’s health or safety could be compromised in obtaining the sample. Residential home inspectors also should not take samples in a commercial or public building. Where to Sample and Ideal Conditions In any areas of a house suspected or confirmed to have mold growth, air samples can be taken to help verify and gather more information. Moisture intrusion, water damage, musty odors, apparent mold growth, or conditions conducive to mold growth are all common reasons to gather an air sample. Samples should be taken near the center of the room, with the collection device positioned 3 to 6 feet off the ground. Ten minutes is an adequate amount of time for the air pump to run while taking samples, but this can be reduced to around five minutes if there is a concern that air movement from a lot of indoor activity could alter the results. The sampling time can be reduced further if there is an active source of dust, such as from ongoing construction. Sampling should take place in livable spaces within the house under closed conditions in order to help stabilize the air and allow for reproducibility of the sampling and measurement. While the sample is being collected, windows and exterior doors should be kept shut other than for normal entry and exit from the home. It is best to have air exchangers (other than a furnace) or fans that exchange indoor-outdoor air switched off during sampling. Weather conditions can be an important factor in gathering accurate data. Severe thunderstorms or unusually high winds can affect the sampling and analysis results. High winds or rapid changes in barometric pressure increase the difference in air pressure between the interior and exterior, which can increase the variability of airborne mold-spore concentration. Large differences in air pressure between the interior and exterior can cause more airborne spores to be sucked inside, skewing the results of the sample. Difficulties and Practicality of Air Sampling It is helpful to think of air sampling as just one tool in the tool belt when inspecting a house for mold problems. An air sample alone is not enough to confirm or refute the existence of a problem, and such testing needs to be accompanied by visual inspection and other methods of data collection, such as a surface sample. Indoor airborne spore levels can vary according to several factors, and this can lead to skewed results if care is not taken to set up the sampling correctly. Also, since only spores are collected with an air sample and may actually be damaged during collection, identification of the mold type can be more difficult than with a sample collected with tape or a cultured sample. Air samples are good for use as a background screen to ensure that there isn’t a large source of mold not yet found somewhere in a home. This is because they can detect long chains of spores that are still intact. These chains normally break apart quickly as they travel through the air, so a sample that reveals intact chains can indicate that there is mold nearby, possibly undiscovered during other tests and visual examination. In summary, when taken under controlled conditions and properly analyzed, air samples for mold are helpful in comparing relative particle levels between a problem and a control area. They can also be crucial for comparing particle levels and air quality in an area before and after mold remediation. Craftsman Home Inspections llc is a home inspection company proudly serving the Aurora CO and Denver CO Metro Areas. If you are looking for a Home Inspector in Aurora or Denver, please give us a call at 720-593-0383 or check us out online at CraftsmanColorado.com or simply schedule your home inspection below.
SCHEDULE INSPECTION by Nick Gromicko and Kate Tarasenko  "Aging in place" is the phenomenon describing senior citizens' ability to live independently in their homes for as long as possible. Those who age in place will not have to move from their present residence in order to secure necessary support services in response to their changing needs. The Baby Boomers As the baby boomers age, the 60+ population will spike from roughly 45 million in recent years to more than 70 million by 2020. Research shows that baby boomers’ expectations of how they will receive care differ from that of their parents’ generation. Overwhelmingly, they will seek care in their own homes and will be less likely to move into congregate living settings. Why do many senior citizens prefer to age in place? Nursing homes, to many, represent a loss of freedom and a reduced quality of life. Here are a few good reasons why these fears are justified:
Inspectors may recommend corrections and adaptations to the home to improve maneuverability, accessibility, and safety for elderly occupants. Some such alterations and recommendations for a home are as follows: Appliances:
Craftsman Home Inspections llc is a home inspection company proudly serving the Aurora CO and Denver CO Metro Areas. If you are looking for a Home Inspector in Aurora or Denver, please give us a call at 720-593-0383 or check us out online at CraftsmanColorado.com or simply schedule your home inspection below.
SCHEDULE INSPECTION by Nick Gromicko and Kenton Shepard 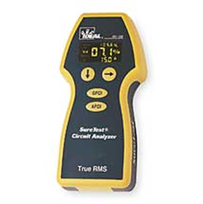 What are AFCIs? Arc-fault circuit interrupters (AFCIs) are special types of electrical receptacles (or outlets) and circuit breakers designed to detect and respond to potentially dangerous electrical arcs in home branch wiring. What are AFCI testers or indicators? AFCI tester indicators (sometimes called AFCI testers) are portable devices designed to test AFCI functionality. They create waveform patterns similar to those produced by actual arc faults, thereby causing working AFCIs to trip. AFCI indicators are considerably larger and more expensive (by several hundred dollars) than ground-fault circuit interrupter (GFCI) indicators and are of questionable effectiveness. For these reasons, they are not used as widely as GFCI indicators. Why are AFCI indicators important? While an AFCI circuit breaker comes with a test button that performs a role similar to a portable AFCI indicator, this button cannot test for arc faults within individual portions of the branch circuit. An AFCI indicator, however, can test any individual receptacle within the branch. InterNACHI inspectors should use AFCI indicators to inspect receptacles observed and deemed to be AFCI-protected. How do they work? AFCI indicators should be inserted directly into the receptacle. Some AFCI indicators, such as the popular #61-165 model produced by Ideal™, offer a number of testing options. This indicator creates eight to 12 pulses of 106 to 141 amp charges in less than a second which should be recognized by the AFCI as a dangerous arc and cause it to open the circuit that it serves. The indicator can also test for nuisance tripping, the annoying tendency of an AFCI to open its circuit when it detects a safe, shared neutral connection. For this test, it produces a 300mA arc that should not cause the AFCI to trip. Some AFCI indicators conveniently incorporate a GFCI indicator into their design. AFCI indicators are somewhat larger than GFCI indicators but they are operated in the same way. An inspector simply inserts one into a receptacle and navigates the menu in order to produce the desired electric current. The user will know that the circuit in question has been tripped if the AFCI device loses power. If this occurs following an AFCI test, the AFCI is functioning properly. The user should then go to the electrical panel to reset the AFCI breaker. If the test results in the failure of an AFCI breaker to open the circuit, then a qualified electrician should be contacted. How effective are they? It is important to understand the distinction between an AFCI indicator and the test button on an AFCI device. The latter produces an actual arc fault and can be relied upon to assess the functionality of the AFCI. An indicator, by contrast, creates waveforms that are not true arcs but are characteristic of them and are thus not a completely reliable measure of an AFCI’s functionality. As a result of this distinction, an indicator might not cause a perfectly functional AFCI to trip. Although commonly called testers, it is more appropriate to refer to them as indicators, despite terminology that often appears in AFCI “tester” user guides. Underwriters Laboratories, a product-testing organization that develops product standards, requires AFCI indicators to include the following information detailing this limitation in their product manuals: CAUTION: AFCIs recognize characteristics unique to arcing, and AFCI indicators produce characteristics that mimic some forms of arcing. Because of this, the indicator may give a false indication that the AFCI is not functioning properly. If this occurs, recheck the operation of the AFCI using the test and reset buttons. The AFCI button test function will demonstrate proper operation. This caution implies that an AFCI is working properly if the indicator causes it to trip, but the reverse is not necessarily true. An AFCI that does not trip as a result of an indicator may actually be perfectly fine. The test button on the circuit interrupter can be used to confirm its malfunction in the event that the indicator does not cause it to trip. Manufacturers claim that their AFCI indicators provide a universal method to test AFCIs that are produced by different companies. In summary, AFCI indicators help ensure that AFCIs are properly monitoring the circuits that they serve for dangerous arc faults. These devices create electrical waveforms characteristic of those produced by an actual arc. As their effectiveness has been debated, they should be viewed as a complement to the test button on an AFCI, rather than a substitute. Craftsman Home Inspections llc is a home inspection company proudly serving the Aurora CO and Denver CO Metro Areas. If you are looking for a Home Inspector in Aurora or Denver, please give us a call at 720-593-0383 or check us out online at CraftsmanColorado.com or simply schedule your home inspection below.
SCHEDULE INSPECTION by Nick Gromicko  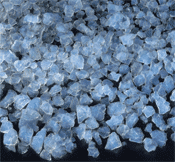  Aerogel is a class of porous, solid materials that exhibits an impressive array of extreme properties. Invented in 1931 and used for decades in scientific applications, aerogel is becoming increasingly feasible as a building insulation, largely due to a decrease in the price of the material. Aerogel is still prohibitively costly for most homeowners, and the few who can afford it probably don’t know what it is. At expensive properties with environmentally friendly features, however, inspectors should be prepared to encounter the material. Also, the prevalence of aerogel is likely to increase in the coming years as it becomes more affordable and widely known. Physical Properties and Identification Aerogel holds 15 world records for material properties, a few of which are listed below. Aerogel is:
Composed almost entirely of gas, which is a poor heat conductor, aerogel can almost nullify the three methods of heat transfer (conduction, convection and radiation). Boasting an R-value of 10 to 30, NASA has used the material to protect astronauts and equipment, such as the Mars Rover, from the extreme cold of space. As compared to conventional insulation material, the R-values of vermiculite, rockwool, fiberglass and cellulose are approximately 2.13, 3.1, 3 and 3.1, respectively. Silica aerogel is especially valuable because silica is also a poor conductor of heat. A metallic aerogel, on the other hand, would be less useful as an insulator. Production Aerogel is derived from gels, which are substances in which solid particles span a liquid medium. The first aerogel was produced from silica gels, although later work involved alumina, chromia, carbon and tin oxide. Through a process called super-critical drying, the liquid component of the gel is removed, leaving behind the hollow, solid framework. The resulting aerogel is a porous, ultra-lightweight lattice composed of more than 90% air. Ordinarily, drying of a gel results in its shrinkage and collapse (think of Jell-O left out for a few days), but super-critical drying is performed under intense heat and pressure that preserve the structure of the gel. Manufacturers offer the material in a variety of forms, such as the granules pictured at right, made by Cabot, which are sometimes used as insulation in skylights. Aspen Aerogel® offers 57-inch wide rolls of the material in 0.2- and 0.4-inch thicknesses, while Thermoblok® comes in 1.5-inch wide strips that are used to cover framing studs and help prevent thermal bridging at a cost of about $1.99 per foot. Safety Aerogel safety is dependent on the safety of the gel from which it was made; it will be carcinogenic, for instance, if the gel from which it was derived had this quality. Fortunately, silica-based aerogel is not known to be dangerous, although it may irritate skin, mucous membranes, eyes, the respiratory tract, and the digestive system. Aerogel is hydroscopic and extremely dry to the touch, which can, in turn, cause it to dry out unprotected skin. Gloves and goggles are recommended for inspectors and contractors who must handle the material. Aerogel does not seem to be an environmental threat. Aspen Aerogel’s® website states: “Aerogel blankets do not meet any of the characteristics of a U.S. EPA hazardous waste,” and further notes that scrap aerogel may be disposed of in landfills that are approved to accept industrial waste. In summary, aerogel is a safe, remarkably effective thermal insulator whose use should become more widespread as it becomes more affordable. Craftsman Home Inspections llc is a home inspection company proudly serving the Aurora CO and Denver CO Metro Areas. If you are looking for a Home Inspector in Aurora or Denver, please give us a call at 720-593-0383 or check us out online at CraftsmanColorado.com or simply schedule your home inspection below.
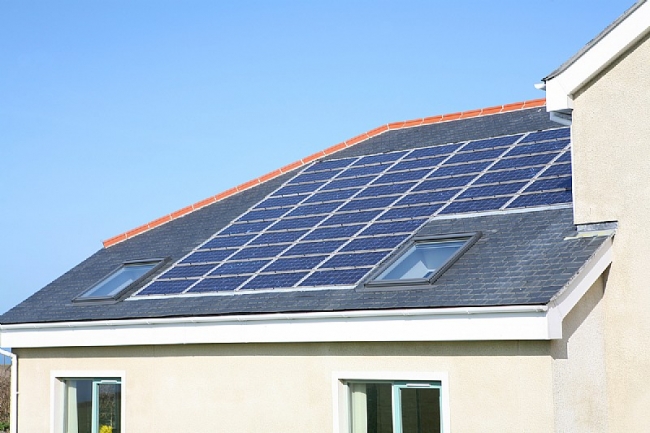
SCHEDULE INSPECTION by Nick Gromicko  Solar energy offers considerable advantages over conventional energy systems by nullifying flaws in those systems long considered to be unchangeable. Solar power for home energy production has its flaws, too, which are outlined in another article, but they're dwarfed by the advantages listed below. The following are advantages of solar energy:
Craftsman Home Inspections llc is a home inspection company proudly serving the Aurora CO and Denver CO Metro Areas. If you are looking for a Home Inspector in Aurora or Denver, please give us a call at 720-593-0383 or check us out online at CraftsmanColorado.com or simply schedule your home inspection below.
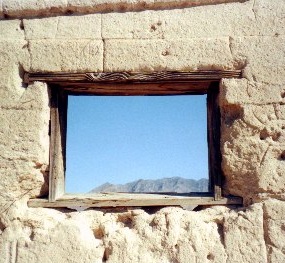
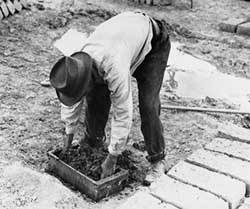
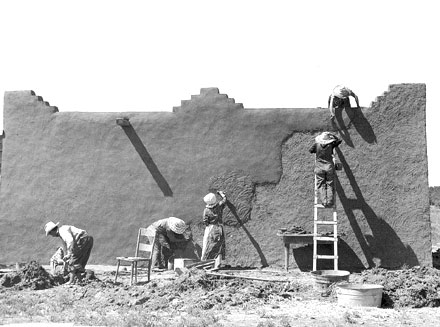
SCHEDULE INSPECTION by Nick Gromicko  Adobe is a natural building material made from clay and sand mixed with water and an organic binder, such as sticks, straw or dung. Adobe structures are more common in inhospitable climates and where lumber is scarce. They're commonly built in low-income communities that lack the resources to construct more complex or conventional designs whose components are more costly. InterNACHI inspectors should be prepared to find adobe buildings in all types of communities -- even wealthy ones -- as green building advocates and experimental builders have become more attracted to adobe construction in recent years. The History of Adobe Due to the abundance of its constituents and ease by which it is produced and shaped, adobe construction is truly ancient and universal. Even the word “adobe” has existed for around 4,000 years, with little change in its pronunciation or meaning; it can be traced from the Middle Egyptian word for “mud brick” and was borrowed by Late Egyptian, Demotic, Coptic, Arabic, Old Spanish and, finally, English. Entire cities have been made from the material and many adobe buildings have seen continuous use for thousands of years. Even within the United States, many of the oldest buildings, indigenous and European, were made from adobe. Two such examples are the San Miguel Mission of Santa Fe, New Mexico, thought to be the oldest church in the country, and Pueblo towns and villages that have withstood the winds of the American West since 750 AD. Today, the use of adobe is still widespread across the American Southwest, North Africa, West Africa, western Asia, South America and southern Europe. Perhaps not surprisingly, adobe is an ideal building material for the climates in which it is most commonly found, such as deserts and other regions typified by hot days and cool nights. The material’s great thermal mass cannot transfer heat without a relatively long input of sun exposure, keeping the interior cool during the daytime when the sun burns intensely. By the time the sun sets, the thick adobe walls will have absorbed the sun’s heat, which is then slowly released into the living space when the outside temperature is at its lowest. By the time the structure has exhausted its heat reserves, the sun will rise again, starting the cycle anew. Adobe provides excellent soundproofing and fire-resistance, which is helpful when a fire must be kept lit during cold nights. It is also easy to produce; according to Sustainable Sources, a green building journal, adobe requires less than 1/150th of the energy required to manufacture a similar amount of Portland cement, and less than five times the energy required to produce ordinary brick. Adobe Construction Elements The following materials are commonly found in adobe construction:
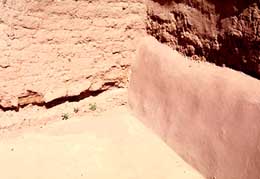
Adobe walls that are not stabilized require exterior coatings to protect against moisture intrusion. Even in stabilized adobe, protective coatings can retard surface deterioration caused by sand, wind and insects. While inspecting adobe homes, InterNACHI inspectors may encounter the following types of coatings:
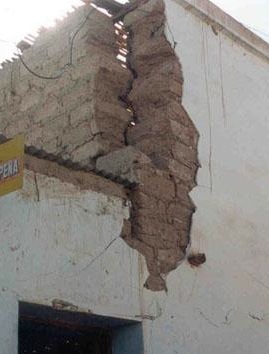
Adobe structures are extremely vulnerable to the effects of moisture, which are mainly in the forms of rainfall and the local water table. Adobe will lose its structural strength as it becomes saturated, turning into putty and eventually flowing and dripping as a liquid. Rainwater splashes can cause coving, which is the hollowing-out of the wall just above grade level. The drying process after rainfall can create furrows, cracks, deep fissures and pitting. Weakened walls will bulge, deform and eventually collapse under the roof’s weight. For these reasons, the survival of adobe structures depends on keeping them free from excessive moisture. The destructive effects of moisture on adobe buildings may be substantially halted by the following remedies:
Adobe Buildings and Earthquake Dangers Adobe is a heavy yet relatively weak building material, which makes adobe structures particularly vulnerable to earthquakes. The typical mode of collapse is out-of-plane failure of the walls, resulting in the loss of support for the roof. The scope of this danger can be seen in the devastation caused by the 2003 earthquake in Bam, Iran, where a 6.6 temblor leveled thousands of adobe homes. Along with them fell the 2,500-year-old Bam Citadel, which, at 180,000 square meters, was then the largest adobe structure in the world. In seismically active Peru, one can further see how not to design earthquake-resistant adobe homes. Traditional construction techniques used there do not call for binding the four walls together, making them vulnerable to even modest seismic shifts in a country that has experienced more than 450 major earthquakes in the last century alone. One Architecture Week reporter commented, “You can see gaps at the corners and between the walls and the roof. That means that when there's an earthquake, the walls just flop outward like cards. And the roofs, which can weigh up to 11 tons, come crashing down, crushing people to death." Experimental building techniques in Peru have revealed that strips of electro-welded wire mesh may be used to "sew" the house together along the inside and outside seams of the walls, which are then covered with concrete. Local materials, such as bamboo and sugar cane, have also been used successfully to strengthen houses against earthquakes. These measures do not make the structure indestructible but, rather, allow the occupants extra time to escape before the ceiling comes crashing down. Building codes related to the structural reinforcement of adobe are more stringent in seismically active regions, and inspectors and adobe homeowners should learn about the earthquake dangers for their region. An engineering analysis should be performed to determine whether and what type of reinforcement may be necessary. According to the UBC, steel reinforcement, if used in adobe, "should be embedded in a cement-based mortar and grout unless there is a positive interlacing of reinforcement around the earthen material." Misguided attempts to secure adobe walls often cause more harm than good, as steel reinforcement inserted vertically into adobe bricks can cause cracking because it prevents the new adobe from naturally shrinking. Steel will also not bond with adobe as easily as it will with fired brick or concrete. Other Inspection Tips Inspectors may notice that adobe walls are pitted, bulging or cracked, or the roof may be sagging, but the cause of these problems may not be obvious. Yet, historic and modern adobe structures share common deterioration problems, so it pays to understand the basic vulnerabilities inherent in the material. Consider the following sources of adobe deterioration:
In summary, adobe is an ancient and beautiful building material, and there are ways to prevent it from returning to the earth on which it stands. InterNACHI inspectors, as well as green homeowners, can help avert costly mistakes and potential disasters by learning some fundamentals about its characteristics. by Nick Gromicko and Kenton Shepard 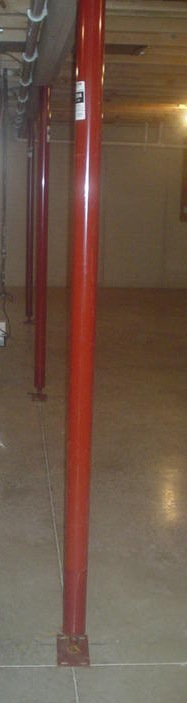 Adjustable steel columns, also known as screw jacks and beam jacks, are hollow steel posts designed to provide structural support. An attached threaded adjustment mechanism is used to adjust the height of the post. A few facts about adjustable steel columns:
Inspectors will not be able to identify paint as rust-inhibitive. In dry climates where rust is not as much of a problem, rust-inhibitive paint may not be necessary. Visible signs of rust constitute a potential defect.
In summary, InterNACHI inspectors may want to inspect adjustable steel columns for problems, although a structural engineer may be required to confirm serious issues. Craftsman Home Inspections llc is a home inspection company proudly serving the Aurora CO and Denver CO Metro Areas. If you are looking for a Home Inspector in Aurora or Denver, please give us a call at 720-593-0383 or check us out online at CraftsmanColorado.com or simply schedule your home inspection below.
SCHEDULE INSPECTION by Nick Gromicko and Ethan Ward 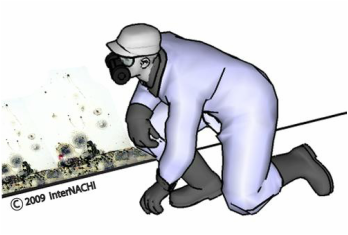 Mold in the Home Health concerns related to the growth of mold in the home have been featured heavily in the news. Problems ranging from itchy eyes, coughing and sneezing to serious allergic reactions, asthma attacks, and even the possibility of permanent lung damage can all be caused by mold, which can be found growing in the home, given the right conditions. All that is needed for mold to grow is moisture, oxygen, a food source, and a surface to grow on. Mold spores are commonly found naturally in the air. If spores land on a wet or damp spot indoors and begin growing, they will lead to problems. Molds produce allergens, irritants and, in some cases, potentially toxic substances called mycotoxins. Inhaling or touching mold or mold spores may cause allergic reactions in sensitive individuals. Allergic responses include hay fever-type symptoms, such as sneezing, runny nose, red eyes, and skin rash (dermatitis). Allergic reactions to mold are common. They can be immediate or delayed. Molds can also trigger asthma attacks in people with asthma who are allergic to mold. In addition, mold exposure can irritate the eyes, skin, nose, throat and lungs of both mold-allergic and non-allergic people. As more is understood about the health issues related to mold growth in interior environments, new methods for mold assessment and remediation are being put into practice. Mold assessment and mold remediation are techniques used in occupational health. Mold assessment is the process of identifying the location and extent of the mold hazard in a structure. Mold remediation is the process of cleanup and/or removal of mold from an indoor environment. Mold remediation is usually conducted by a company with experience in construction, demolition, cleaning, airborne-particle containment-control, and the use of special equipment to protect workers and building occupants from contaminated or irritating dust and organic debris. A new method that is gaining traction in this area is abrasive blasting. Abrasive Blasting The first step in combating mold growth is not to allow for an environment that is conducive to its growth in the first place. Controlling moisture and assuring that standing water from leaks or floods is eliminated are the most important places to start. If mold growth has already begun, the mold must be removed completely, and any affected surfaces must be cleaned or repaired. Traditional methods for remediation have been slow and tedious, often involving copious amounts of hand-scrubbing and sanding. Abrasive blasting is a new technique that is proving to be less tedious and time-consuming, while maintaining a high level of effectiveness. Abrasive blasting is a process for cleaning or finishing objects by using an air-blast or centrifugal wheel that throws abrasive particles against the surface of the work pieces. Sand, dry ice and corncobs are just some of the different types of media used in blasting. For the purposes of mold remediation, sodium bicarbonate (baking soda) and dry ice are the media commonly used. Benefits of Abrasive Blasting Abrasive (or “media”) blasting provides some distinct advantages over traditional techniques of mold remediation. In addition to eliminating much of the tedious labor involved in scrubbing and sanding by hand, abrasive blasting is extremely useful for cleaning irregular and hard-to-reach surfaces. Surfaces that have cross-bracing or bridging can be cleaned more easily, as well as areas such as the bottom of a deck, where nails may be protruding. Areas that are difficult to access, such as attics and crawlspaces, can also be cleaned more easily with abrasive blasting than by traditional methods. The time saved is also an advantage, and the typical timeframe for completion of a mold remediation project can often be greatly reduced by utilizing abrasive blasting. Soda-Blasting Soda-blasting is a type of abrasive blasting that utilizes sodium bicarbonate as the medium propelled by compressed air. One of the earliest and most widely publicized uses of soda-blasting was on the restoration of the Statue of Liberty. In May of 1982, President Ronald Reagan appointed Lee Iacocca to head up a private-sector effort for the project. Fundraising began for the $87 million restoration under a public-private partnership between the National Park Service and The Statue of Liberty-Ellis Island Foundation, Inc. After extensive work that included the use of soda-blasting, the restored monument re-opened to the public on July 5, 1986, during Liberty Weekend, which celebrated the statue's centennial. The baking soda used in soda-blasting is soft but angular, appearing knife-like under a microscope. The crystals are manufactured in state-of-the-art facilities to ensure that the right size and shape are consistently produced. Baking soda is water-soluble, with a pH near neutral. Baking-soda abrasive blasting effectively removes mold while minimizing damage to the underlying surface (i.e., wood, PVC, modern wiring, ductwork, etc.). When using the proper equipment setup (correct nozzles, media regulators, hoses, etc.) and technique (proper air flow, pressure, angle of attack, etc.), the process allows for fast and efficient removal of mold, with a minimum of damage, waste and cleanup. By using a soda blaster with the correct-size nozzle, the amount of baking soda used is minimized. Minimal baking soda means better visibility while working, and less cleanup afterward. Dry-Ice Blasting Dry ice is solidified carbon dioxide that, at -78.5° C and ambient pressure, changes directly into a gas as it absorbs heat. Dry ice pellets are made by taking liquid carbon dioxide (CO2) from a pressurized storage tank and expanding it at ambient pressure to produce snow. The snow is then compressed through a die to make hard pellets. The pellets are readily available from most dry ice suppliers nationwide. For dry-ice blasting, the standard size used is 1/8-inch, high-density dry ice pellets. The dry-ice blasting process includes three phases, the first of which is energy transfer. Energy transfer works when dry ice pellets are propelled out of the blasting gun at supersonic speed and impact the surface. The energy transfer helps to knock mold off the surface being cleaned, with little or no damage. The freezing effect of the dry ice pellets hitting the mold creates the second phase, which is micro-thermal shock, caused by the dry ice’s temperature of -79º C, between the mold and the contaminated surface. This phase isn’t as much a factor in the removal of mold as it is for removing resins, oils, waxes, food particles, and other contaminants and debris. For these types of substances, the thermal shock causes cracking and delaminating of the contaminant, furthering the elimination process. The final phase is gas pressure, which happens when the dry ice pellets explode on impact. As the pellets warm, they convert to CO2 gas, generating a volume expansion of 400 to 800 times. The rapid gas expansion underneath the mold forces it off the surface. HEPA Vacuuming A HEPA vacuum is a vacuum cleaner with a high-efficiency particulate air (or HEPA) filter through which the contaminated air flows. HEPA filters, as defined by the U.S. Department of Energy’s standard adopted by most American industries, remove at least 99.97% of airborne particles that are as small as 0.3 micrometers (µm) in diameter. HEPA vacuuming is necessary in conjunction with blasting for complete mold removal. While abrasive blasting with either baking soda or dry ice is an effective technique, remediation will not be complete until HEPA filtering or vacuuming has been done. Abrasive blasting removes mold from contaminated surfaces, but it also causes the mold spores to become airborne again. The spores can cover the ground and the surfaces that have already been cleaned. So, the mold spores need to be removed by HEPA filters. Additionally, while some remediation companies claim that there will be no blasting media to remove after cleaning, especially with the dry-ice method, there will be at least a small amount of visible debris left by the blasting that must be removed before HEPA vacuuming can occur. HEPA vacuuming removes all invisible contaminants from surfaces and the surrounding air. When HEPA vacuuming is completed, samples at the previously contaminated areas should be re-tested to ensure that no mold or mold spores remain. Abrasive blasting using dry ice or baking soda, combined with HEPA-filter vacuuming, is an effective method for mold remediation. InterNACHI inspectors who offer ancillary mold inspection services should be aware of the benefits and applications of this technique adapted for remediating mold in homes. Craftsman Home Inspections llc is a home inspection company proudly serving the Aurora CO and Denver CO Metro Areas. If you are looking for a Home Inspector in Aurora or Denver, please give us a call at 720-593-0383 or check us out online at CraftsmanColorado.com or simply schedule your home inspection below.
SCHEDULE INSPECTION |
AuthorCraftsman Home Inspections. We are your Aurora and Denver Colorado Home Inspectors. Here you will find useful information about the Home Inspection industry as well as home maintenance tips. Archives
April 2020
Categories |


 RSS Feed
Our
|
Craftsman Home Inspections llcAt Craftsman Home Inspections we are professionals who promise to give you our best Home inspection every time.
|
|