|
|
by Nick Gromicko and Kenton Shepard 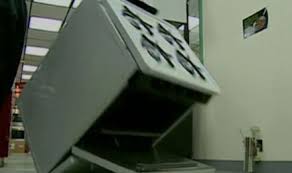 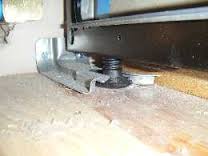   Anti-tip brackets are metal devices designed to prevent freestanding ranges from tipping. They are normally attached to a rear leg of the range or screwed into the wall behind the range, and are included in all installation kits. A unit that is not equipped with these devices may tip over if enough weight is applied to its open door, such as that from a large Thanksgiving turkey, or even a small child. A falling range can crush, scald, or burn anyone caught beneath. Bracket Inspection Inspectors can confirm the presence of anti-tip brackets through the following methods:
Clients can contact the dealer or builder who installed their range and request that they install a bracket. For clients who wish to install a bracket themselves, the part can be purchased at most hardware stores or ordered from a manufacturer. General Electric will send their customers an anti-tip bracket for free. According to the U.S. Consumer Product Safety Commission (CPSC), there were 143 incidents caused by range tip-overs from 1980 to 2006. Of the 33 incidents that resulted in death, most of those victims were children. A small child may stand on an open range door in order to see what is cooking on the stovetop and accidentally cause the entire unit to fall on top of him, along with whatever hot items may have been cooking on the stovetop. The elderly, too, may be injured while using the range for support while cleaning. InterNACHI inspectors who inspect ovens should never leave the oven door open while the oven is unattended. In response to this danger, the American National Standards Institute (ANSI) and Underwriters Laboratories (UL) created standards in 1991 that require all ranges manufactured after that year to be capable of remaining stable while supporting 250 pounds of weight on their open doors. Manufacturers' instructions, too, require that anti-tip brackets provided be installed. Despite these warnings, retailer Sears estimated in 1999 that a mere 5% of the gas and electric units they sold were ever equipped with anti-tip brackets. As a result of Sears’ failure to comply with safety regulations, they were sued and subsequently required to secure ranges in nearly 4 million homes, a measure that has been speculated to have cost Sears as much as $500 million. In summary, ranges are susceptible to tipping if they are not equipped with anti-tip brackets. Inspectors should know how to confirm that these safety devices are present.  Craftsman Home Inspections llc is a home inspection company proudly serving the Aurora CO and Denver CO Metro Areas. If you are looking for a Home Inspector in Aurora or Denver, please give us a call at 720-593-0383 or check us out online at CraftsmanColorado.com or simply schedule your home inspection below.
SCHEDULE INSPECTION
0 Comments
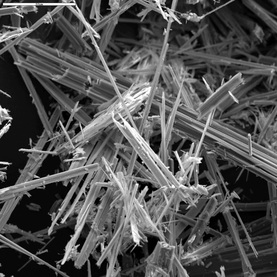 What is Asbestos? Asbestos is a mineral fiber that can be positively identified only with a special type of microscope. There are several types of asbestos fibers. In the past, asbestos was added to a variety of products to strengthen them and to provide heat insulation and fire resistance. InterNACHI inspectors can supplement their knowledge with the information offered in this guide. How Can Asbestos Affect My Health? From studies of people who were exposed to asbestos in factories and shipyards, we know that breathing high levels of asbestos fibers can lead to an increased risk of lung cancer in the forms of mesothelioma, which is a cancer of the lining of the chest and the abdominal cavity, and asbestosis, in which the lungs become scarred with fibrous tissue. The risk of lung cancer and mesothelioma increase with the number of fibers inhaled. The risk of lung cancer from inhaling asbestos fibers is also greater if you smoke. People who get asbestosis have usually been exposed to high levels of asbestos for a long time. The symptoms of these diseases do not usually appear until about 20 to 30 years after the first exposure to asbestos. Most people exposed to small amounts of asbestos, as we all are in our daily lives, do not develop these health problems. However, if disturbed, asbestos material may release asbestos fibers, which can be inhaled into the lungs. The fibers can remain there for a long time, increasing the risk of disease. Asbestos material that would crumble easily if handled, or that has been sawed, scraped, or sanded into a powder, is more likely to create a health hazard. Where Can I Find Asbestos and When Can it Be a Problem? Most products made today do not contain asbestos. Those few products made which still contain asbestos that could be inhaled are required to be labeled as such. However, until the 1970s, many types of building products and insulation materials used in homes contained asbestos. Common products that might have contained asbestos in the past, and conditions which may release fibers, include:
If you think asbestos may be in your home, don't panic. Usually, the best thing to do is to leave asbestos material that is in good condition alone. Generally, material in good condition will not release asbestos fibers. There is no danger unless the asbestos is disturbed and fibers are released and then inhaled into the lungs. Check material regularly if you suspect it may contain asbestos. Don't touch it, but look for signs of wear or damage, such as tears, abrasions or water damage. Damaged material may release asbestos fibers. This is particularly true if you often disturb it by hitting, rubbing or handling it, or if it is exposed to extreme vibration or air flow. Sometimes, the best way to deal with slightly damaged material is to limit access to the area and not touch or disturb it. Discard damaged or worn asbestos gloves, stove-top pads and ironing board covers. Check with local health, environmental or other appropriate agencies to find out proper handling and disposal procedures. If asbestos material is more than slightly damaged, or if you are going to make changes in your home that might disturb it, repair or removal by a professional is needed. Before you have your house remodeled, find out whether asbestos materials are present. How to Identify Materials that Contain Asbestos You can't tell whether a material contains asbestos simply by looking at it, unless it is labeled. If in doubt, treat the material as if it contains asbestos, or have it sampled and analyzed by a qualified professional. A professional should take samples for analysis, since a professional knows what to look for, and because there may be an increased health risk if fibers are released. In fact, if done incorrectly, sampling can be more hazardous than leaving the material alone. Taking samples yourself is not recommended. If you nevertheless choose to take the samples yourself, take care not to release asbestos fibers into the air or onto yourself. Material that is in good condition and will not be disturbed (by remodeling, for example) should be left alone. Only material that is damaged or will be disturbed should be sampled. Anyone who samples asbestos-containing materials should have as much information as possible on the handling of asbestos before sampling and, at a minimum, should observe the following procedures:
How to Manage an Asbestos Problem If the asbestos material is in good shape and will not be disturbed, do nothing! If it is a problem, there are two types of corrections: repair and removal. Repair usually involves either sealing or covering asbestos material. Sealing (encapsulation) involves treating the material with a sealant that either binds the asbestos fibers together or coats the material so that fibers are not released. Pipe, furnace and boiler insulation can sometimes be repaired this way. This should be done only by a professional trained to handle asbestos safely. Covering (enclosure) involves placing something over or around the material that contains asbestos to prevent the release of fibers. Exposed insulated piping may be covered with a protective wrap or jacket. With any type of repair, the asbestos remains in place. Repair is usually cheaper than removal, but it may make removal of asbestos later (if found to be necessary) more difficult and costly. Repairs can either be major or minor. Major repairs must be done only by a professional trained in methods for safely handling asbestos. Minor repairs should also be done by professionals, since there is always a risk of exposure to fibers when asbestos is disturbed. Repairs Doing minor repairs yourself is not recommended, since improper handling of asbestos materials can create a hazard where none existed. If you nevertheless choose to do minor repairs, you should have as much information as possible on the handling of asbestos before doing anything. Contact your state or local health department or regional EPA office for information about asbestos training programs in your area. Your local school district may also have information about asbestos professionals and training programs for school buildings. Even if you have completed a training program, do not try anything more than minor repairs. Before undertaking minor repairs, carefully examine the area around the damage to make sure it is stable. As a general rule, any damaged area which is bigger than the size of your hand is not considered a minor repair. Before undertaking minor repairs, be sure to follow all the precautions described previously for sampling asbestos material. Always wet the asbestos material using a fine mist of water containing a few drops of detergent. Commercial products designed to fill holes and seal damaged areas are available. Small areas of material, such as pipe insulation, can be covered by wrapping a special fabric, such as re-wettable glass cloth, around it. These products are available from stores (listed in the telephone directory under "Safety Equipment and Clothing") which specialize in asbestos materials and safety items. Removal is usually the most expensive method and, unless required by state or local regulations, should be the last option considered in most situations. This is because removal poses the greatest risk of fiber release. However, removal may be required when remodeling or making major changes to your home that will disturb asbestos material. Also, removal may be called for if asbestos material is damaged extensively and cannot be otherwise repaired. Removal is complex and must be done only by a contractor with special training. Improper removal may actually increase the health risks to you and your family. Asbestos Professionals: Who Are They and What Can They Do? Asbestos professionals are trained in handling asbestos material. The type of professional will depend on the type of product and what needs to be done to correct the problem. You may hire a general asbestos contractor or, in some cases, a professional trained to handle specific products containing asbestos. Asbestos professionals can conduct inspections, take samples of suspected material, assess its condition, and advise on the corrections that are needed, as well as who is qualified to make these corrections. Once again, material in good condition need not be sampled unless it is likely to be disturbed. Professional correction or abatement contractors repair and remove asbestos materials. Some firms offer combinations of testing, assessment and correction. A professional hired to assess the need for corrective action should not be connected with an asbestos-correction firm. It is better to use two different firms so that there is no conflict of interest. Services vary from one area to another around the country. The federal government offers training courses for asbestos professionals around the country. Some state and local governments also offer or require training or certification courses. Ask asbestos professionals to document their completion of federal or state-approved training. Each person performing work in your home should provide proof of training and licensing in asbestos work, such as completion of EPA-approved training. State and local health departments or EPA regional offices may have listings of licensed professionals in your area. If you have a problem that requires the services of asbestos professionals, check their credentials carefully. Hire professionals who are trained, experienced, reputable and accredited -- especially if accreditation is required by state or local laws. Before hiring a professional, ask for references from previous clients. Find out if they were satisfied. Ask whether the professional has handled similar situations. Get cost estimates from several professionals, as the charges for these services can vary. Though private homes are usually not covered by the asbestos regulations that apply to schools and public buildings, professionals should still use procedures described in federal or state-approved training. Homeowners should be alert to the chance of misleading claims by asbestos consultants and contractors. There have been reports of firms incorrectly claiming that asbestos materials in homes must be replaced. In other cases, firms have encouraged unnecessary removal or performed it improperly. Unnecessary removal is a waste of money. Improper removal may actually increase the health risks to you and your family. To guard against this, know what services are available and what procedures and precautions are needed to do the job properly. In addition to general asbestos contractors, you may select a roofing, flooring or plumbing contractor trained to handle asbestos when it is necessary to remove and replace roofing, flooring, siding or asbestos-cement pipe that is part of a water system. Normally, roofing and flooring contractors are exempt from state and local licensing requirements because they do not perform any other asbestos-correction work. Asbestos-containing automobile brake pads and linings, clutch facings and gaskets should be repaired and replaced only by a professional using special protective equipment. Many of these products are now available without asbestos. If you hire an InterNACHI inspector who is trained in asbestos inspection:
If you hire a corrective-action contractor:
Craftsman Home Inspections llc is a home inspection company proudly serving the Aurora CO and Denver CO Metro Areas. If you are looking for a Home Inspector in Aurora or Denver, please give us a call at 720-593-0383 or check us out online at CraftsmanColorado.com or simply schedule your home inspection below.
SCHEDULE INSPECTION by Nick Gromicko 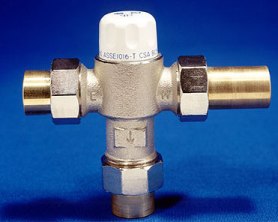 Anti-scald valves, also known as tempering valves and mixing valves, mix cold water in with outgoing hot water so that the hot water that leaves a fixture is not hot enough to scald a person. Facts and Figures
Anti-scald valves mitigate this danger by maintaining water temperature at a safe level, even as pressures fluctuate in water supply lines. They look similar to ordinary shower and tub valves and are equipped with a special diaphragm or piston mechanism that immediately balances the pressure of the hot- and cold-water inputs, limiting one or the other to keep the temperature within a range of several degrees. As a side effect, the use of an anti-scald valve increases the amount of available hot water, as it is drawn more slowly from the water heater. Inspectors and homeowners may want to check with the authority having jurisdiction (AHJ) to see if these safety measures are required in new construction in their area. Installation of anti-scald valves is typically simple and inexpensive. Most models are installed in the hot-water line and require a cold-water feed. They also require a swing check valve on the cold-water feed line to prevent hot water from entering the cold-water system. They may be installed at the water heater to safeguard the plumbing for the whole building, or only at specific fixtures. The actual temperature of the water that comes out of the fixture may be somewhat different than the target temperature set on the anti-scald valve. Such irregularities may be due to long, uninsulated plumbing lines or defects in the valve itself. Users may fine-tune the valve with a rotating mechanism that will allow the water to become hotter or colder, depending on which way it’s turned. Homeowners may contact an InterNACHI inspector or a qualified plumber if they have further questions or concerns. In summary, anti-scald valves are used to reduce water temperature fluctuations that may otherwise inconvenience or harm unsuspecting building occupants. Craftsman Home Inspections llc is a home inspection company proudly serving the Aurora CO and Denver CO Metro Areas. If you are looking for a Home Inspector in Aurora or Denver, please give us a call at 720-593-0383 or check us out online at CraftsmanColorado.com or simply schedule your home inspection below.
SCHEDULE INSPECTION by Nick Gromicko 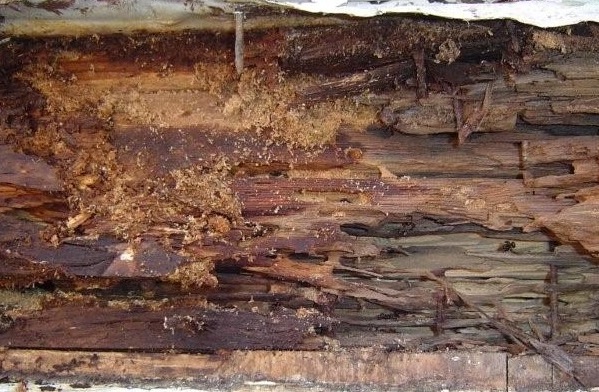 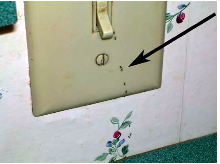  Ants are among the most prevalent pests in households, restaurants, hospitals, offices, warehouses, and virtually all buildings where food and water can be found. While mostly harmless to humans, ants (especially carpenter ants) can cause considerable building damage. Inspectors can expand their knowledge base by being able to identify some of the telltale signs of ant infestation. Ant Behavior Ants are social insects that live in colonies divided into three castes: queens, males and workers. Most of the ants you may observe, which are responsible for gathering food, are sterile female workers. Winged males and females will leave the nest to mate, and to find suitable locations for new colonies. After mating, the males die and the impregnated females (queens) shed their wings and lay eggs that will hatch into the legless, grub-like larvae. The queen takes care of these larvae as they develop until they finally become pupae. Within a few weeks, adult worker ants emerge from these pupae and take over the job of tending the young. Distinguishing Ants from Termites Winged ants are often mistaken for winged termites, which also leave their nests to mate. These insects can be distinguished from one another by three main characteristics:
Nests Carpenter ants nest in both moist and dry wood, but they prefer moist wood. Accordingly, nests are more likely to be found in wood dampened by water leaks, such as wood around bathtubs and sinks, poorly sealed windows and door frames, roof leaks and poorly flashed chimneys. Nests are especially common in moist, hollow spaces, such as the wall void behind a dishwasher and in a hollow deck column. As there will often be no external signs of damage, probing the wood with a screwdriver helps reveal the excavated "galleries." Another technique for locating hidden nests is to tap along baseboards and other wood surfaces with the blunt end of a screwdriver while listening for the hollow sound of tunneled wood. If a nest is nearby, carpenter ants often will respond by making a rustling sound within the nest. Inspection The following clues are evidence that a building is host to an ant infestation:
A number of steps can be taken by homeowners to reduce the potential for future ant problems, such as:
Craftsman Home Inspections llc is a home inspection company proudly serving the Aurora CO and Denver CO Metro Areas. If you are looking for a Home Inspector in Aurora or Denver, please give us a call at 720-593-0383 or check us out online at CraftsmanColorado.com or simply schedule your home inspection below.
SCHEDULE INSPECTION by Nick Gromicko  July 2010 A foreclosure is a process by which a homeowner loses their property, usually to a lender or local government, for failure to pay agreed-upon taxes, payments or fees. Common reasons for foreclosures include:
Most mortgage contracts include an acceleration clause, which gives the lender power to demand accelerated repayment if certain agreed-upon terms are violated. If the borrower falls behind on monthly payments or fails to notify the lender of a property transfer, for instance, the lender can demand that the entire debt be paid immediately. If there is no acceleration clause and terms have been violated, the lender may still be able to file suit against the borrower to recoup the debt. The borrower may contest a foreclosure in court by challenging the validity of the debt. If repossession is imminent, the debtor must seek a temporary restraining order. If the lender feels that foreclosure is not in their best interests (such as if the value of the property is less than its outstanding mortgage), they may renegotiate with the borrower by lowering the interest rate or premium. Although several government incentives promote renegotiation, most lenders are too wary of re-default to consider it as an option. If attempts to prevent the foreclosure fail, it will proceed in one of the following three fashions:
Craftsman Home Inspections llc is a home inspection company proudly serving the Aurora CO and Denver CO Metro Areas. If you are looking for a Home Inspector in Aurora or Denver, please give us a call at 720-593-0383 or check us out online at CraftsmanColorado.com or simply schedule your home inspection below.
SCHEDULE INSPECTION       Mold Basics
Why is mold growing in my home? Molds are part of the natural environment. Outdoors, molds play a part in nature by breaking down dead organic matter, such as fallen leaves and dead trees. But indoors, mold growth should be avoided. Molds reproduce by means of tiny spores; the spores are invisible to the naked eye and float through outdoor and indoor air. Mold may begin growing indoors when mold spores land on surfaces that are wet. There are many types of mold, and none of them will grow without water or moisture. Can mold cause health problems? Molds are usually not a problem indoors, unless mold spores land on a wet or damp spot and begin growing. Molds have the potential to cause health problems. Molds produce allergens (substances that can cause allergic reactions), irritants and, in some cases, potentially toxic substances (mycotoxins). Inhaling or touching mold or mold spores may cause allergic reactions in sensitive individuals. Allergic responses include hay fever-type symptoms, such as sneezing, runny nose, red eyes, and skin rash (dermatitis). Allergic reactions to mold are common. They can be immediate or delayed. Molds can also cause asthma attacks in people with asthma who are allergic to mold. In addition, mold exposure can irritate the eyes, skin, nose, throat and lungs of both mold-allergic and non-allergic people. Symptoms other than the allergic and irritant types are not commonly reported as a result of inhaling mold. Research on mold and health effects is ongoing. This article provides a brief overview; it does not describe all potential health effects related to mold exposure. For more detailed information, consult a health professional. You may also wish to consult your state or local health department. How do I get rid of mold? It is impossible to get rid of all mold and mold spores indoors. Some mold spores will be found floating through the air and in house dust. Mold spores will not grow if moisture is not present. Indoor mold growth can and should be prevented or controlled by controlling moisture indoors. If there is mold growth in your home, you must clean up the mold and fix the water problem. If you clean up the mold but don't fix the water problem, then, most likely, the mold problem will recur. Who should do the cleanup? This depends on a number of factors. One consideration is the size of the mold problem. If the moldy area is less than about 10 square feet (less than roughly a 3-foot by 3-foot patch), in most cases, you can handle the job yourself, following the guidelines below.
Tips and Techniques The tips and techniques presented in this section will help you clean up your mold problem. Professional cleaners or remediators may use methods not covered here. Please note that mold may cause staining and cosmetic damage. It may not be possible to clean an item so that its original appearance is restored.
How do I know when the remediation or cleanup is finished?You must have completely fixed the water or moisture problem before the cleanup or remediation can be considered finished, based on the following guidelines:
Moisture and Mold Prevention and Control Tips
Testing or Sampling for Mold Is sampling for mold needed? In most cases, if visible mold growth is present, sampling is unnecessary. Since no EPA or other federal limits have been set for mold or mold spores, sampling cannot be used to check a building's compliance with federal mold standards. Surface sampling may be useful to determine if an area has been adequately cleaned or remediated. Sampling for mold should be conducted by professionals who have specific experience in designing mold sampling protocols, sampling methods, and interpreting results. Sample analysis should follow analytical methods recommended by the American Industrial Hygiene Association (AIHA), the American Conference of Governmental Industrial Hygienists (ACGIH), or other professional organizations. Suspicion of Hidden Mold You may suspect hidden mold if a building smells moldy but you cannot see the source, or if you know there has been water damage and residents are reporting health problems. Mold may be hidden in places such as the backside of dry wall, wallpaper or paneling, the top-side of ceiling tiles, or the underside of carpets and pads, etc. Other possible locations of hidden mold include areas inside walls around pipes (with leaking or condensing pipes), the surface of walls behind furniture (where condensation forms), inside ductwork, and in roof materials above ceiling tiles (due to roof leaks or insufficient insulation). Investigating Hidden Mold Problems Investigating hidden mold problems may be difficult and will require caution when the investigation involves disturbing potential sites of mold growth. For example, removal of wallpaper can lead to a massive release of spores if there is mold growing on the underside of the paper. If you believe that you may have a hidden mold problem, consider hiring an experienced professional. Cleanup and Biocides Biocides are substances that can destroy living organisms. The use of a chemical or biocide that kills organisms such as mold (chlorine bleach, for example) is not recommended as a routine practice during mold cleanup. There may be instances, however, when professional judgment may indicate its use (for example, when immune-compromised individuals are present). In most cases, it is not possible or desirable to sterilize an area; a background level of mold spores will remain, and these spores will not grow if the moisture problem has been resolved. If you choose to use disinfectants or biocides, always ventilate the area and exhaust the air to the outdoors. Never mix chlorine bleach with other cleaning solutions or detergents that contain ammonia because toxic fumes could be produced. Please note: Dead mold may still cause allergic reactions in some people, so it is not enough to simply kill the mold; it must also be removed. Ten Things You Should Know About Mold 1. Potential health effects and symptoms associated with mold exposure include allergic reactions, asthma, and other respiratory complaints. 2. There is no practical way to eliminate all mold and mold spores in the indoor environment; the way to control indoor mold growth is to control moisture. 3. If mold is a problem in your home, you must clean up the mold and eliminate sources of moisture. 4. Fix the source of the water problem or leak to prevent mold growth. 5. Reduce indoor humidity (to 30% to 60%) to decrease mold growth by: a. venting bathrooms, dryers, and other moisture-generating sources to the outside; b. using air conditioners and de-humidifiers; c. increasing ventilation; and d. using exhaust fans whenever cooking, dishwashing, and cleaning. 6. Clean and dry any damp or wet building materials and furnishings within 24 to 48 hours to prevent mold growth. 7. Clean mold off hard surfaces with water and detergent, and dry completely. Absorbent materials that are moldy (such as carpeting and ceiling tiles) may need to be replaced. 8. Prevent condensation. Reduce the potential for condensation on cold surfaces (i.e., windows, piping, exterior walls, roof and floors) by adding insulation. 9. In areas where there is a perpetual moisture problem, do not install carpeting. 10. Molds can be found almost anywhere; they can grow on virtually any substance, provided moisture is present. There are molds that can grow on wood, paper, carpet, and foods. Craftsman Home Inspections llc is a home inspection company proudly serving the Aurora CO and Denver CO Metro Areas. If you are looking for a Home Inspector in Aurora or Denver, please give us a call at 720-593-0383 or check us out online at CraftsmanColorado.com or simply schedule your home inspection below.
SCHEDULE INSPECTION |
AuthorCraftsman Home Inspections. We are your Aurora and Denver Colorado Home Inspectors. Here you will find useful information about the Home Inspection industry as well as home maintenance tips. Archives
April 2020
Categories |

 RSS Feed
Our
|
Craftsman Home Inspections llcAt Craftsman Home Inspections we are professionals who promise to give you our best Home inspection every time.
|
|